FLAT TILE DRY
VERGE SYSTEM
 

KYTUN FLAT TILE DRY VERGE SYSTEM INSTALLATION GUIDE - STAGES 1,2 & 3


Stage 1

Stage 2

Stage 3

Starting at the base of the roofline, position the tile trim against the battens, secure it and place the internal rubber joiner on the upper end of the trim.
 
Please note the tile trim should overhang by a minimum of 50mm, to allow for proper fitting of the end cap.

Allowing a 5mm gap for expansion, position the second length of the tile trim into the rubber joiner, and join both lengths using the external joiner piece.
 
it is recommended that the upper end of the tile trim at the roof apex is cut to the required length and angle before nailing to battens.

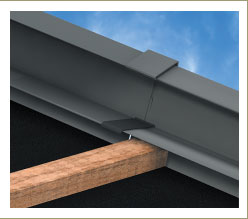
Finally the top ridge unit is fitted at the apex and secured using the innovative butterfly fixing mechanism (see image above).
 
Neutral curing silicone is recommended to seal all joints.


home about slate dry verge flat tile dry verge aluminium roof flashing stockists technical gallery brochures

contact links flashing overview ridge & corner capping aluminium soaker aluminium valley trough aluminium rolled flashing aluminium context views flat tile overview

flat tile dry verge system 2 part joiner end cap apex joiner aluminium flat tile dry verge flat tile context views flat tile installation guide slate dry verge overview standard slate trim - type1

standard slate trim - type2 slate roof valley trim existing roof slate trim slate context views       copyright: kytun.com 2010 design :: nolka.com